
Posted Monday, 21-Mar-2022 by Ingo Karkat
My own photos, but also clipped screenshots, look a lot better if they are framed by some border effect; I've used an effect that looks as if the image was sloppily torn out of a sheet of paper in one of my first pages of my website, the muesli recipe from 2001. Initially I've used Paint Shop Pro for that; IrfanView also has Image > Add border/frame… > Broken edge frame. But these take time to apply, either because parameters need to be remembered / tweaked, or additional steps are necessary (for transparency).
In order to focus on providing content, I'm increasingly relying on scripting, and ImageMagick is widely available, fully scriptable, powerful and free. In this article I'll outline the basic effect, and then show how multiple image transformations can be combined, using ImageMagick 6.9.10-23 Q16 x86_64 20190101 from Ubuntu 20.04.
 |
original The original image (200 x 200 pixel from the built-in wizard: image)
$ convert wizard: -crop 200x200+0+0! - | display - |
|
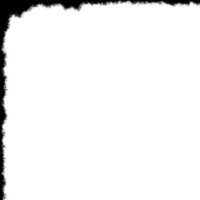 |
border The tear-out border effect1 as a black-white mask.
$ convert wizard: \
    -alpha extract -virtual-pixel black -spread 35 -blur 0x3 -threshold 50% -spread 1 -blur 0x.7 \
    example-border.png
|
|
 |
tornout Combined with the original image, this looks as if torn out of paper, but only as long as the background itself isn't white. (The image on the right shows the almost invisible effect on this off-white background.)
$ convert wizard: \
    example-border.png -compose copy-opacity -composite \
    example-tornout.png
The copy-opacity compose method looks for opacity information in the second image (here: example-border.png), and as that is missing, instead takes the image itself as a grayscale channel; i.e. the white parts will be opaque and the black parts transparent. In general, -composite takes a destination image and overlays a second source image according to the current -compose settings. |
 |
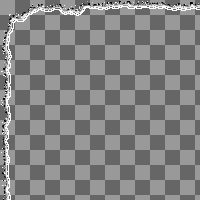 |
emboss To make this work for bright backgrounds, add an embossed border, generated via edge detection from the tear-out border2.
$ convert border.png \
    -edge 1 -negate -transparent white \
    example-emboss.png
Edge detection marks abrupt changes in brightness with white lines on black background; we negate this and then make the overwhelmingly white background transparent, so that only the dark border remains. |
|
 |
result Combined with the third image, the embossed border now works for any kind of background (as you can see on the right).
$ convert wizard: border.png -compose copy-opacity -composite \
    example-emboss.png -compose over -composite \
    result.png
-compose over is the default alpha blending of the (second) source over the (first) destination; it needs to be specified here because we've previously configured the non-default copy-opacity method. |
 |
Okay, now put this into a script. For efficiency, but also to avoid having to deal with several temp files, I'd like to do all of the transformations with one ImageMagick invocation; however, that was quite tricky, so I started with an intermediate image of the tear-out border effect. This is used twice; once combined with the original image to frame it, and once to derive the embossed edge that is then also combined with the original. As the random border is generated randomly, the same image has to be reused, and it cannot be re-generated, as the shapes wouldn't match.
Instead of writing a temporary PNG image, ImageMagick has a special file format optimized for temporary storage:
The Magick Pixel Cache (MPC) format is designed to eliminate the overhead of decoding and encoding pixels to and from an image format. MPC writes two files. One, with the extension .mpc, retains all the properties associated with the image or image sequence (e.g. width, height, colorspace, etc.) and the second, with the extension .cache, is the pixel cache in the native raw format. [...] The trade-off is in disk space. MPC is generally larger in file size than most other image formats. The most efficient use of MPC image files is a write-once, read-many-times pattern.
$ convert wizard: \
    -alpha extract -virtual-pixel black -spread 35 -blur 0x3 -threshold 50% -spread 1 -blur 0x.7 \
    temp.mpc
$ convert wizard: temp.mpc -compose copy-opacity -composite \
    \( temp.mpc -edge 1 -negate -transparent white \) \
    -compose over -composite - | \
        display -alpha background -
The first command creates the temporary border image. The second command merges that with the original image. In a separate image stack (denoted by the \( ... \)), the temporary border image is transformed to the embossed border — all commands inside the parentheses only apply to the border image; the framed original image is stashed away until the end of the parentheses are reached. Then, it is merged with the embossed border.
To get rid of the temporary image, it has to be stored inside ImageMagick's stack. The documentation mentions four useful operators: -clone, -delete, -insert, and -swap.
To tackle this problem, it's super important to visualize the stack, its contents, and the current scope to which operators are getting applied. In the following command, I've interjected sketches of the stack at that point in the command pipeline:
$ convert wizard: \
    # 0:original
    \( +clone -alpha extract -virtual-pixel black -spread 35 -blur 0x3 -threshold 50% -spread 1 -blur 0x.7 -alpha off \) \
    # 0:original (1:original → border)
    \( -clone 0-1 -compose copy-opacity -composite \) \
    # 0:original 1:border (2:original 3:border → tornout)
    \( -clone 1 -edge 1 -negate -transparent white \) \
    # 0:original 1:border 2:tornout (3:border → emboss)
    -delete 0-1 \
    # (2→0):tornout (3→1):emboss
    -compose over -composite result.png
    # 0:result
And here's the complete single command again:
$ convert wizard: \
    \( +clone -alpha extract -virtual-pixel black -spread 35 -blur 0x3 -threshold 50% -spread 1 -blur 0x.7 -alpha off \) \
    \( -clone 0-1 -compose copy-opacity -composite \) \
    \( -clone 1 -edge 1 -negate -transparent white \) \
    -delete 0-1 -compose over -composite - | \
        display -alpha background -
In the actual script, the static wizard: image is replaced by a passed source image, and the result is not passed to ImageMagick's display command ("-" specifies writing to / reading from standard output / input), but instead uses a target filename generated as a variation of the input file's. The embossing is optionally enabled via a command-line option (as it would be difficult to detect the image's contrast around its border automatically), and it also handles JPEG files (which do not support transparency and therefore need to have a fixed background color rendered into it).
Ingo Karkat, 21-Mar-2022
ingo's blog is licensed under Attribution-ShareAlike 4.0 International![]()
![]()
![]()