
Building on my similar project from six years ago, it's time again for a little hand-drawn animation (like Google does so well with their doodles, only much more primitive).
The digital part was all done on my old Ubuntu 16.04 LTS notebook, exclusively with open-source tools:
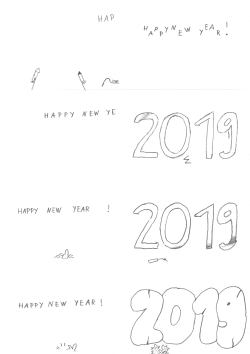
This time, I partitioned an A4 sheet into 2 x 4 frames (by folding). I started with the left-upper frame as the first one, continued on the same position of the second sheet, and so on, until I had reached the last (eighth) one. I then continued with the frame below the left-upper one on the first sheet again, and went through all sheets seven more times. This makes it easy to put the previous frame underneath the current one (just align the sheets), which is helpful to correctly position the elements. Only when returning to the first sheet, the alignment has to be done with an offset on a fold instead. You see an example sheet on the right.
When scanning the sheets, the frames ideally would all have the same sizes. Unfortunately, I forgot to consider the small margin on the glass that the (cheap) scanner cannot cover, so both top frames were a little bit shorter, and the digital division wasn't properly aligned. I had to insert padding at the top to account for that.
Also, my sheets weren't exactly A4, but old endless printer paper, which is a little bit longer, so the scanner wouldn't capture the very end (which shows up in the final explosion sequence), and I had to add bottom padding, too. Here's the Bash script that I used to pad the scans and the cut them into images:
for ((i = 1; i <= 8; i++))
do
    convert scan000${i}.png -splice 0x24 -gravity south -splice 0x119 pad000${i}.png
    convert pad000${i}.png -scene "$(((i-1)*8))" -crop 50%x25% +repage img%04d.png
done
The following script renumbers the individual images into the sequential frames. During a (16-frame, two-sheet) test run, I had done this manually, but I thought it would be a good idea to generalize it. In the end, getting the algorithm right probably took much longer than another manual rename, but it was a good practice:
: ${pageNum:=8}
: ${imageNum:=8}

for ((frameIdx = 0; frameIdx < $((pageNum * imageNum)); frameIdx++))
do
    x=$((2 * (frameIdx / pageNum)))
    if [ $((x / imageNum)) -gt 0 ]; then
	x=$((2 * (frameIdx / pageNum) - imageNum + 1))
    fi
    imageIdx=$(((imageNum * (frameIdx % pageNum)) + x))

    printf -v image 'img%04d.png' "$imageIdx"
    printf -v frame 'frame%04d.png' "$frameIdx"
    cp -f "$image" "$frame"
done
Finally, the build script that creates both full-size and shrunk animations as GIF and WebM. When looping the animation, it's important to have a short pause at the end. In GIF, this can be done via a longer -delay, but that apparently doesn't make in into the WebM version, so I duplicated the last frame(s) instead.
: ${NAME:=merry2019}
animate()
{
    convert -loop 0 -delay 20 frame*.png \
		frame0000.png frame0000.png frame0000.png frame0000.png \
		frame0032.png frame0032.png frame0032.png frame0032.png \
		frame0032.png frame0032.png frame0032.png frame0032.png \
		+repage "$@"
}
animate "$NAME.gif"
animate -resize 50% "$NAME.half.gif"

for variant in '' .half
do
    convert "$NAME${variant}.gif" +matte +map "$NAME${variant}.opt.gif"
    ffmpeg -y -i "${NAME}${variant}.gif" \
		-r 16 -c:v libvpx -quality good -cpu-used 0 -b:v 500K -crf 12 \
		-pix_fmt yuv420p -movflags faststart "${NAME}${variant}.webm"
done
I really enjoyed this, both the creativity of drawing those moving objects, finding and creating matching sounds, and also the digital processing, especially the powerful ImageMagick tool set. I hope this won't be the last occasion for such an animation (but maybe I'll try stop-motion next time instead?!) I wish you all a happy new year and lots of fun!!!